Repairing Damaged Vehicle Wrapping: Tears, Bubbles, Peeling

Vehicle wraps have seen a significant surge in popularity in recent years, offering an aesthetic and protective alternative to traditional paint. However, despite the improved quality of today’s vinyl films, damage such as tears, bubbles, or peeling frequently occurs. These imperfections compromise not only the vehicle’s appearance but also the integrity of the applied protection. Repairing damaged wraps therefore requires precise knowledge of the materials and mastery of appropriate techniques. Understanding the causes of these defects and the methods for restoring them ensures optimal longevity of the adhesive film and avoids costly repairs. This article provides a comprehensive analysis of the difficulties encountered when repairing wraps, including practical examples and maintenance tips. This is part of a broader approach aimed at optimizing the durability and aesthetic value of vehicle wraps.
Vinyl tearing: common causes and effective repair methods
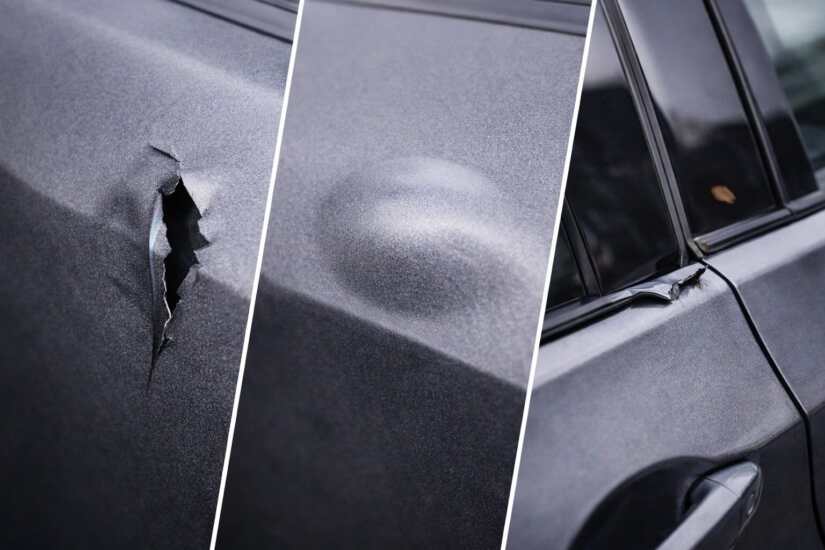
Vehicle wrap tears are one of the major problems faced by motorists and professionals in the wrapping industry. Often caused by an impact, a snag, or improper handling, they weaken the adhesion and expose the underlying paint, compromising the protection. The vinyl materials used for vehicle wraps are designed to be quite resistant, but prolonged exposure to external elements or poor maintenance can reduce their durability.
Analyzing the circumstances of the tear is the first step in choosing the appropriate repair. A tear located on a flat area will be easier to repair than a tear along a curve or fold, where the vinyl is stretched and more fragile. For small tears, the repair often involves precise bonding using a special vinyl film adhesive, along with careful smoothing to avoid any irregularities. Complete replacement of the damaged area is a solution considered when the tear is too large or irreparable.
A concrete example: a car owner noticed a tear in the hood caused by a branch while parked in a wooded area. The repair involved carefully removing the damaged section, preparing the surface by cleaning and degreasing it, and then applying a vinyl patch identical to the original using a heat-sealing technique to ensure perfect tension. The result restored both the appearance and protection without the need for repainting.
Furthermore, preventing a tear requires a thorough understanding of the most vulnerable areas, such as the rocker panels or door corners. Attention to detail, such as the door coverings to ensure symmetry and visual consistency These risks can be mitigated by improving the quality of the initial application and using specific films adapted to mechanical stresses. Prevention remains a key aspect of the durability of the vehicle wrap.
Air bubbles under the adhesive film: causes, detection and repair strategies
Air bubbles are a common problem for owners of wrapped vehicles. These bubbles usually form during application, but can also appear later, for example, due to trapped moisture or improper surface preparation. They not only detract from the visual appearance but also promote gradual peeling and the penetration of debris or water, which can damage the underlying paint.
To properly identify and repair bubbles, it is crucial to understand their nature. Some are small, isolated bubbles, easily treated by carefully piercing them with a fine needle and then smoothing the area to expel the air. Other, larger bubbles may require partially removing the vinyl for repositioning, or even a complete replacement if the vinyl has lost its adhesion.
For example, a specialist workshop had to deal with a case where several air bubbles had appeared under a roof wrap. After a thorough inspection, they removed the film from that area and cleaned the bodywork according to the preparation standards outlined in this guide on surface preparationThe vinyl was then repositioned, applying even and controlled pressure using a special squeegee. Applying a moderate heat source softened the film and completely eliminated the bubbles.
It’s important to note that the quality of the surface and the care taken during the initial application directly influence whether or not bubbles appear. Checking for the absence of dust, grease, or micro-roughness is essential. Conversely, an improper application method can immediately create bubbles, which can be harmful in the long run.
Vehicle wrap detachment: understanding the issues and mastering corrective measures
Vinyl film peeling is often the result of poor adhesion between the vehicle surface and the wrap. This failure can occur following prolonged UV exposure, mechanical damage, or improper initial application. Peeling is a serious problem because it compromises protection against impacts and scratches, and accelerates the aging of the vehicle’s bodywork.
To effectively resolve a peeling issue, it’s essential to first diagnose the precise cause. If the surface was improperly prepared, it’s imperative to thoroughly clean it, removing any wax, silicone, or dust residue that could prevent proper adhesion. Next, the affected area should be gently heated to activate the adhesive and allow for effective repositioning of the vinyl.
In a practical case, a customer experiencing peeling on their rear bumper benefited from a multi-step intervention: partial removal of the film, degreasing with isopropyl alcohol, pressing with a heated roller, and finally, a quality control check. The result was a perfect finish restored, without any visible creases or loss of adhesion.
The professional should also advise motorists on the importance of maintenance to minimize these types of incidents. Regular maintenance, in particular avoiding abrasive products and respecting the recommendations of…covering maintenance helps maintain the integrity of the adhesive film while ensuring increased longevity.
Best practices for restoring a damaged wrap: equipment, products and technical advice
Restoring a damaged vehicle wrap is not simply a matter of sticking or repositioning patches. It requires advanced mastery of tools, appropriate products, and precise methods to guarantee a uniform and durable finish.
Essential equipment for a reliable repair
Choosing the right tools is crucial. It is recommended to use flexible plastic scrapers, thin spatulas, controlled heat guns, sharp-bladed cutters, and specific cleaning solutions (isopropyl alcohol, non-aggressive degreasers). This equipment allows you to treat defects without damaging the vinyl or paint.
Products suitable for repairing vinyl wrap
The market offers professional adhesives specifically designed for automotive vinyl, which ensure strong adhesion and good flexibility. It is also advisable to avoid, as explained in this guide on prohibited products for vehicle wrapping, the use of solvents or aggressive solvents that damage the film.
Technical advice for sustainable restoration
A successful restoration relies on several key steps: surface preparation, thorough cleaning, precise cutting of the area to be repaired, methodical application of the adhesive, and heat sealing to stabilize the vinyl. It is important to respect drying times and avoid excessive tension on the film during application. Improper handling can quickly lead to new tears or bubbles.
To illustrate these recommendations, a vehicle wrapping professional recently shared a series of best practices for renovating a rocker panel covering deteriorated. He particularly emphasizes the “surface preparation” phase, described as key to a durable wrap, and the use of high-quality adhesive.
- Check each step of the preparation to eliminate any trace of contamination
- Use a specific adhesive to cover sensitive areas
- Apply a gradual heat treatment to avoid overheating.
- Regularly check the condition of the post-repair coating to detect any new defects early.
- Consult experienced professionals or specialized tutorials for complex cases
FAQs on repairing damaged vehicle wraps
Can you repair a tear in a vehicle wrap yourself?
It’s possible to repair a small tear yourself using a specific adhesive and appropriate tools. However, for larger tears or complex areas, it’s advisable to call in a professional to ensure a flawless finish.
How to prevent bubbles from appearing after applying a vehicle wrap?
Proper surface preparation, a high-quality film, and careful application with smoothing are essential to avoid bubbles. It is also important to ensure that no dust or moisture is trapped during application.
Which products should be avoided for the maintenance of a vehicle wrap?
Avoid using harsh solvents, abrasive polishes, or undiluted alcohol-based cleaners. These products weaken the adhesive and can cause it to detach.
Can a peeling vinyl wrap be restored over a large area?
It is possible to restore the covering on large surfaces, but this often requires partial or complete removal, thorough cleaning and careful reapplication, often best carried out by an experienced technician.
Does the wrap effectively protect the paintwork against impacts?
Yes, adhesive vinyl acts as protection against minor scratches and impacts. Specific areas like the hood or trunk are often reinforced with dedicated wrapping for better protection, detailed in This item.
Learning the technical steps for repairing damaged vehicle wraps allows you to better understand the constraints and nuances of adhesive vinyl. This knowledge makes it easier to choose the appropriate method for each type of damage, whether it’s a tear, a bubble, or peeling. Regular maintenance also helps extend the wrap’s lifespan and preserve its aesthetic appearance.
Observing the procedure for removing air bubbles demonstrates the importance of using the right equipment and a methodical approach. It’s not simply a matter of piercing and gluing, but of controlling the film tension and drying phases. Successful restoration prevents premature deterioration and optimizes protection.